Summary
A Pottery wheel technique for “pulling up”.
Thoughts
Notes
For anyone who has learned the skills of centering and opening a ball of clay, the philosophy of the technique presented here is quite simple and based upon sound mechanical principles. The initial basic cylinder is treated as a series of sections, one above the other. The top, and then the upper sections are thinned and pulled upward, using power transferred through stronger, thicker clay of the lower walls that support the weight.
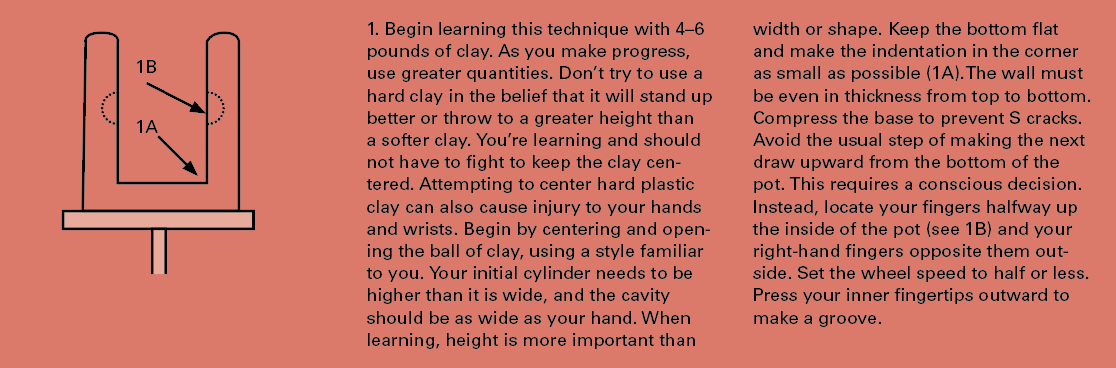
- Begin learning this technique with 4-6 pounds of clay. As you make progress, use greater quantities. Don’t try to use a hard clay in the belief that it will stand up better or throw to a greater height than a softer clay. You’re learning and should not have to fight to keep the clay centered. Attempting to center hard plastic clay can also cause injury to your hands and wrists. Begin by centering and open- ing the ball of clay, using a style familiar to you. Your initial cylinder needs to be higher than it is wide, and the cavity should be as wide as your hand. When learning, height is more important than width or shape. Keep the bottom flat and make the indentation in the corner as small as possible (1A). The wall must be even in thickness from top to bottom. Compress the base to prevent S cracks. Avoid the usual step of making the next draw upward from the bottom of the pot. This requires a conscious decision. Instead, locate your fingers halfway up the inside of the pot (see 1B) and your right-hand fingers opposite them out- side. Set the wheel speed to half or less. Press your inner fingertips outward to make a groove.
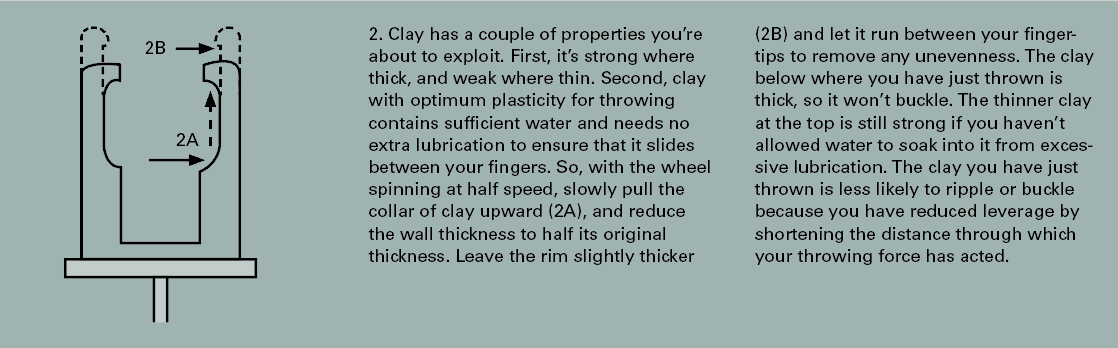
- Clay has a couple of properties you’re about to exploit. First, it’s strong where thick, and weak where thin. Second, clay with optimum plasticity for throwing contains sufficient water and needs no extra lubrication to ensure that it slides between your fingers. So, with the wheel spinning at half speed, slowly pull the collar of clay upward (2A), and reduce the wall thickness to half its original thickness. Leave the rim slightly thicker (2B) and let it run between your finger- tips to remove any unevenness. The clay below where you have just thrown is thick, so it won’t buckle. The thinner clay at the top is still strong if you haven’t allowed water to soak into it from excessive lubrication. The clay you have just thrown is less likely to ripple or buckle because you have reduced leverage by shortening the distance through which your throwing force has acted.
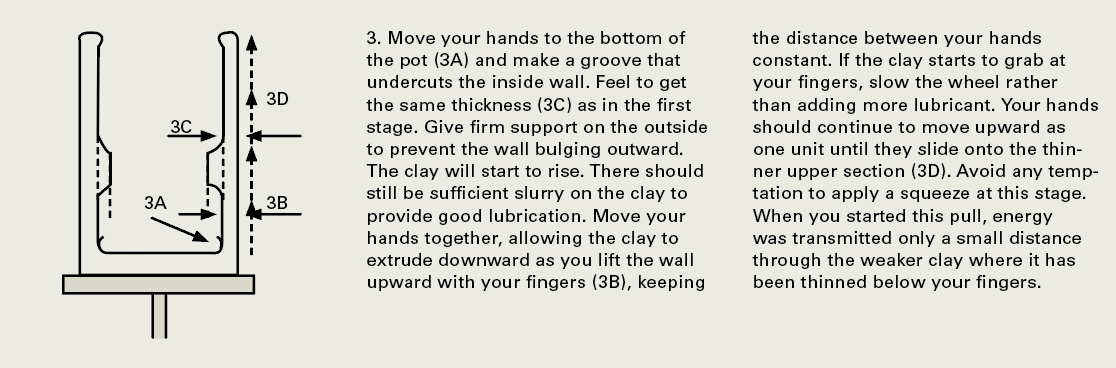
- Move your hands to the bottom of the pot (3A) and make a groove that undercuts the inside wall. Feel to get the same thickness (3C) as in the first stage. Give firm support on the outside to prevent the wall bulging outward. The clay will start to rise. There should still be sufficient slurry on the clay to provide good lubrication. Move your hands together, allowing the clay to extrude downward as you lift the wall upward with your fingers (3B), keeping the distance between your hands constant. If the clay starts to grab at your fingers, slow the wheel rather than adding more lubricant. Your hands should continue to move upward as one unit until they slide onto the thin- ner upper section (3D). Avoid any temptation to apply a squeeze at this stage. When you started this pull, energy was transmitted only a small distance through the weaker clay where it has been thinned below your fingers.
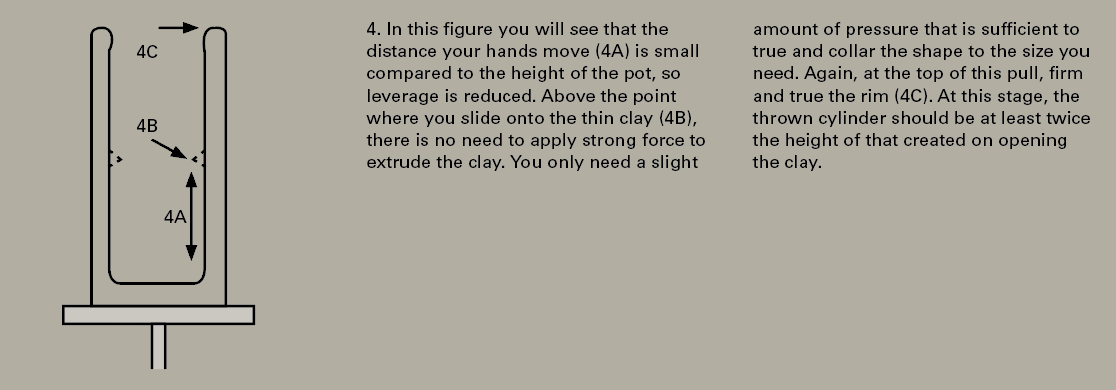
- In this figure you will see that the distance your hands move (4A) is small compared to the height of the pot, so leverage is reduced. Above the point where you slide onto the thin clay (4B), there is no need to apply strong force to extrude the clay. You only need a slight amount of pressure that is sufficient to true and collar the shape to the size you need. Again, at the top of this pull, firm and true the rim (4C). At this stage, the thrown cylinder should be at least twice the height of that created on opening the clay.
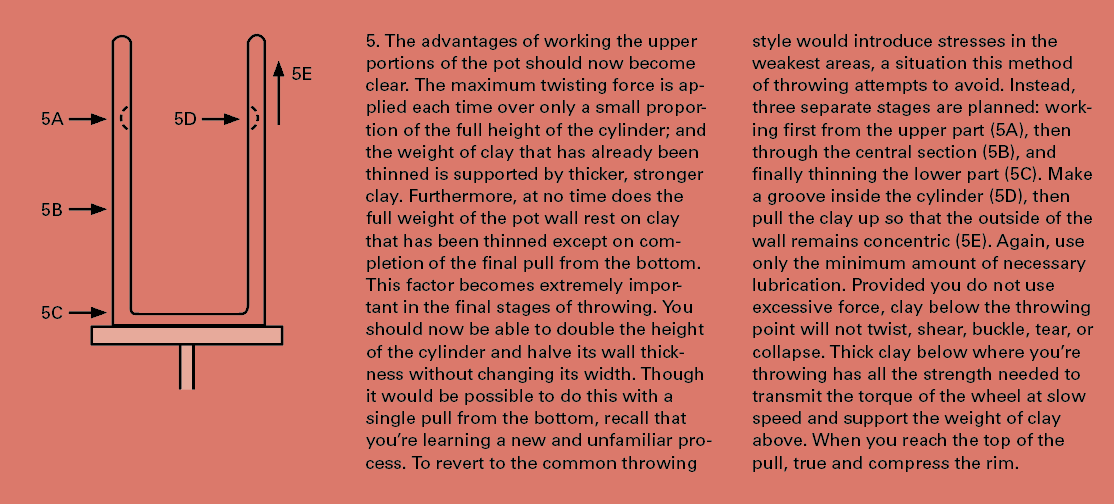
- The advantages of working the upper portions of the pot should now become clear. The maximum twisting force is ap- plied each time over only a small propor- tion of the full height of the cylinder; and the weight of clay that has already been thinned is supported by thicker, stronger clay. Furthermore, at no time does the full weight of the pot wall rest on clay that has been thinned except on com- pletion of the final pull from the bottom. This factor becomes extremely impor- tant in the final stages of throwing. You should now be able to double the height of the cylinder and halve its wall thick- ness without changing its width. Though it would be possible to do this with a single pull from the bottom, recall that you’re learning a new and unfamiliar pro- cess. To revert to the common throwing style would introduce stresses in the weakest areas, a situation this method of throwing attempts to avoid. Instead, three separate stages are planned: work- ing first from the upper part (5A), then through the central section (5B), and finally thinning the lower part (5C). Make a groove inside the cylinder (5D), then pull the clay up so that the outside of the wall remains concentric (5E). Again, use only the minimum amount of necessary lubrication. Provided you do not use excessive force, clay below the throwing point will not twist, shear, buckle, tear, or collapse. Thick clay below where you’re throwing has all the strength needed to transmit the torque of the wheel at slow speed and support the weight of clay above. When you reach the top of the pull, true and compress the rim.
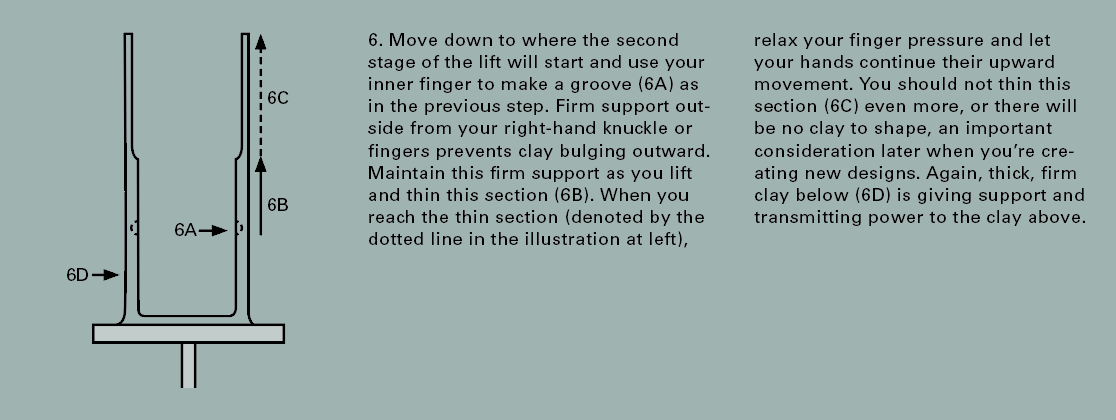
- Move down to where the second stage of the lift will start and use your inner finger to make a groove (6A) as in the previous step. Firm support out- side from your right-hand knuckle or fingers prevents clay bulging outward. Maintain this firm support as you lift and thin this section (6B). When you reach the thin section (denoted by the dotted line in the illustration at left), relax your finger pressure and let your hands continue their upward movement. You should not thin this section (6C) even more, or there will be no clay to shape, an important consideration later when you’re cre- ating new designs. Again, thick, firm clay below (6D) is giving support and transmitting power to the clay above.
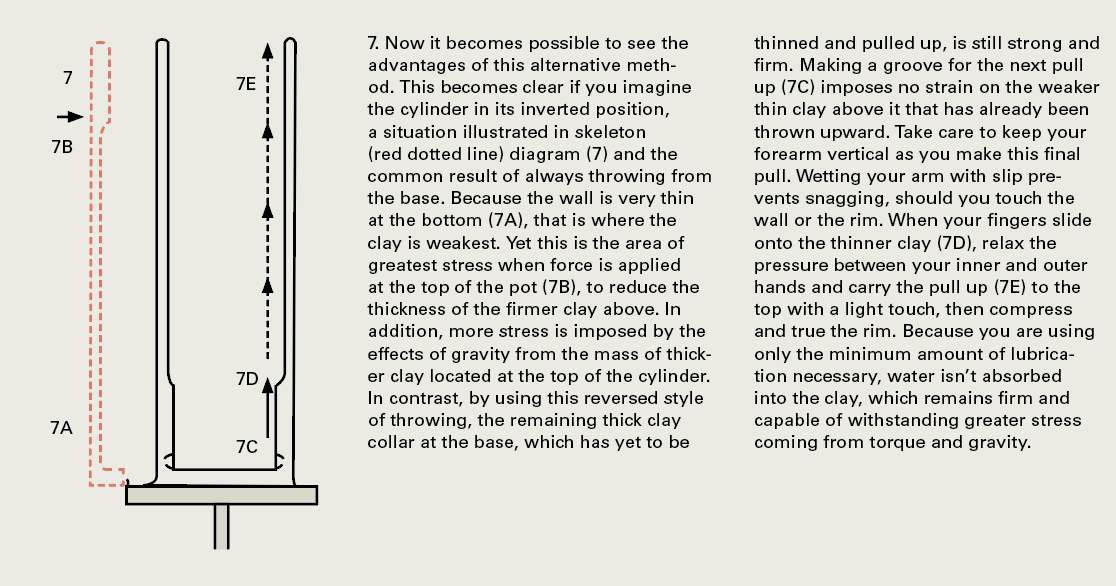
- Now it becomes possible to see the advantages of this alternative meth- od. This becomes clear if you imagine the cylinder in its inverted position, a situation illustrated in skeleton (red dotted line) diagram (7) and the common result of always throwing from the base. Because the wall is very thin at the bottom (7A), that is where the clay is weakest. Yet this is the area of greatest stress when force is applied at the top of the pot (7B), to reduce the thickness of the firmer clay above. In addition, more stress is imposed by the effects of gravity from the mass of thick- er clay located at the top of the cylinder. In contrast, by using this reversed style of throwing, the remaining thick clay collar at the base, which has yet to be thinned and pulled up, is still strong and firm. Making a groove for the next pull up (7C) imposes no strain on the weaker thin clay above it that has already been thrown upward. Take care to keep your forearm vertical as you make this final pull. Wetting your arm with slip pre- vents snagging, should you touch the wall or the rim. When your fingers slide onto the thinner clay (7D), relax the pressure between your inner and outer hands and carry the pull up (7E) to the top with a light touch, then compress and true the rim. Because you are using only the minimum amount of lubrica- tion necessary, water isn’t absorbed into the clay, which remains firm and capable of withstanding greater stress coming from torque and gravity.
- To complete the cylinder, keep the wheel turning slowly while you mop out any water that has collected in the bottom using a sponge on a stick (8A). Use a flat rib (8B) to skim slurry off the outer wall. Trim the base with a slight undercut using a wooden knife tool (8C), and refine the rim (8D) using a chamois. Your cylinder is ready for shaping. If your attempt has been successful, it may be preferable to cut under the base and set the cylinder aside to set up before invert- ing it for drying to finish.

Bibliography
Lewis, Ivor. n.d. “Throwing Tall Pots: Philosophy, Theory, and Practice.” Default. Accessed August 7, 2023. https://ceramicartsnetwork.org/pottery-making-illustrated/pottery-making-illustrated-article/Throwing-Tall-Pots-Philosophy-Theory-and-Practice.