Nicholas Elorreaga, (Nick-E 2018)
Summary
Progression
You may find at some progression that you start to feel the muscular effort and tension more-so in your lower back muscles than your core. This means the difficulty of the exercise you have chosen, or the number of reps you have performed exceeds the capability of your intrinsic core muscles (mostly your transverse abdominis). This is a good marker for appropriate intensity. If you feel this, make it easier.
Level 0: Breathing
[…] lie flat on your back with your knees up (you can also put your legs up on a chair, or your bed). Place one hand on your upper chest (just below your neck, around your collarbones) and the other between the bottom of your ribs and your belly-button.
Breathe in and out. Your upper hand should not move. Your lower hand should move up and down with your breath.
Level 1: Static hold
Deadbug Level 1: Static Hold (a)
- Lie on the ground, with your knees up and feet on the floor just in front of your butt, relaxed.
- Take a nice deep diaphragm-driven breath in, and then start to breathe all your air out like you’re blowing out through a big straw
- As you are breathing out, start ratcheting up the tension in your brace, engaging all the core muscles as we outlined above:
- Ribs Down (Rectus Abs and/or Internal Obliques)
- Belly in (Transverse Abs)
- Ribs Narrow/Together (Internal Obliques)
- Once you are fully tense and fully out of air, you can lift the legs up to 90 degrees, and start taking little sips of air, expanding mostly into your sides and back, but also potentially into your belly if you have that degree of control over your internal obliques. If you can’t yet do either, sorry you’ll have to hold your breath or else you’ll lose tension.
- At no point should your lower back lose gentle contact with the floor. It should not be pressing hard into it, but it also should not be arched.
This variation of deadbug is useful for individuals who struggle not to flare their ribs in things like handstands, overhead presses, and such. […] if you have a very weak brace, then simply moving your arms as far overhead as you can will involuntarily cause your ribs to lift in order to compensate.
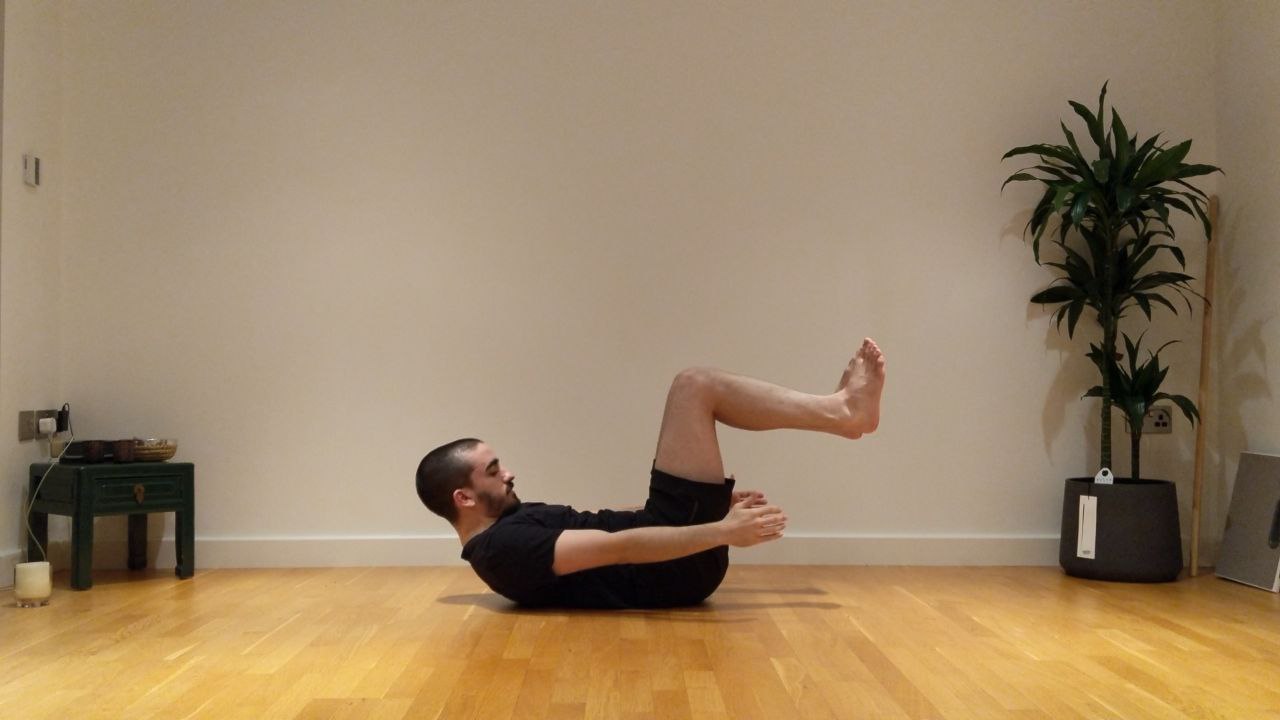
Level 2: 90 degree one-leg extension
Deadbug Level 2: 90deg Heel Taps (a)
In the braced, static deadbug position, keeping your legs locked at 90 degrees of knee bend, slowly lower one leg down until the heel gently touches the floor, then return it to the start position. Repeat with the other leg, that’s one rep.
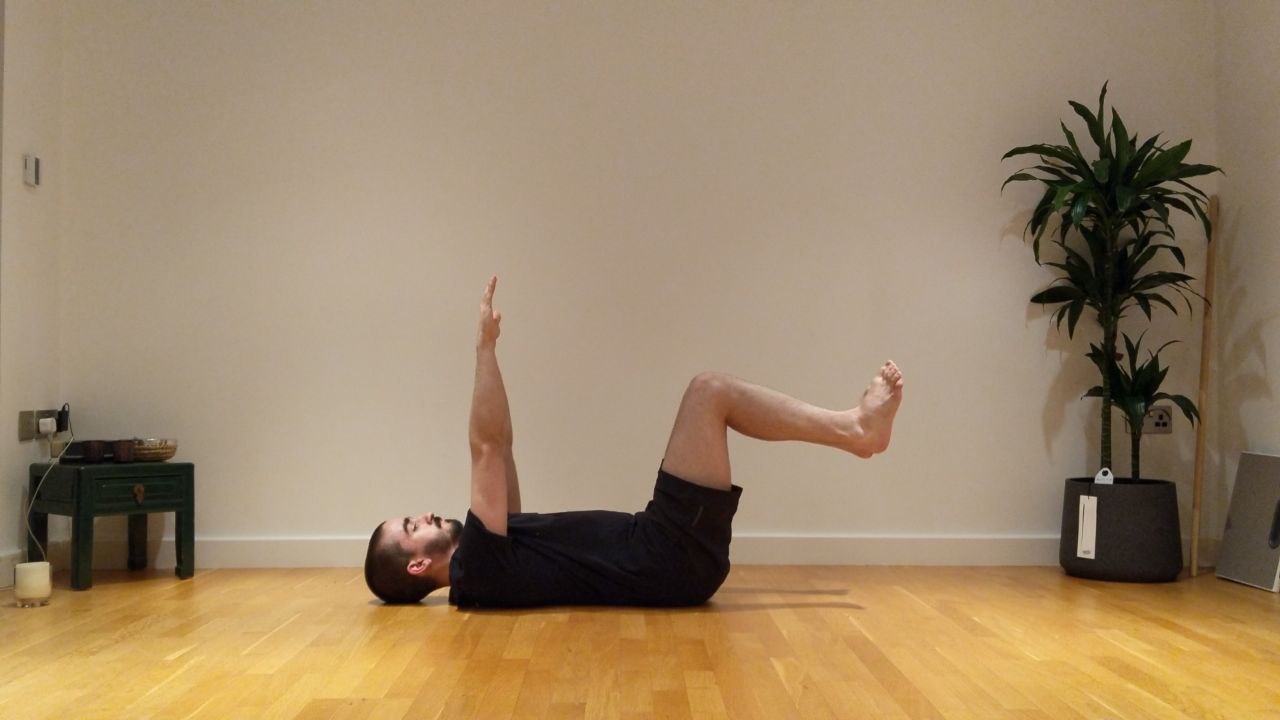
Level 3: Single-leg extension
Deadbug Level 3: Single Leg Extension (a)
[…] starting in the braced static starting position, slowly extend one leg out, reaching your heel far out and down until your leg is straight. In a scenario of ideal hip flexibility, you should seek to reach your calf to the floor (depending on the size of your calf, your only your heel may touch as mine does, this is fine). If your hip flexibility is limited, only lower the leg as far to the floor as you can without losing your mid-line position (i.e. without your lower back arching to compensate).
Level 4: Contralateral extension (opposite limb; marching)
Deadbug Level 4: Contralateral Extensions (a)
Further difficulty can be added by mixing the arms and legs movement, performing opposite extensions every rep (e.g. left arm extends out, so right leg extends out, and vice versa).
Level 5: Double-leg extension
Deadbug Level 5: Double Leg Extension (a)
For further challenge to the core, both legs can be extended at the same time.
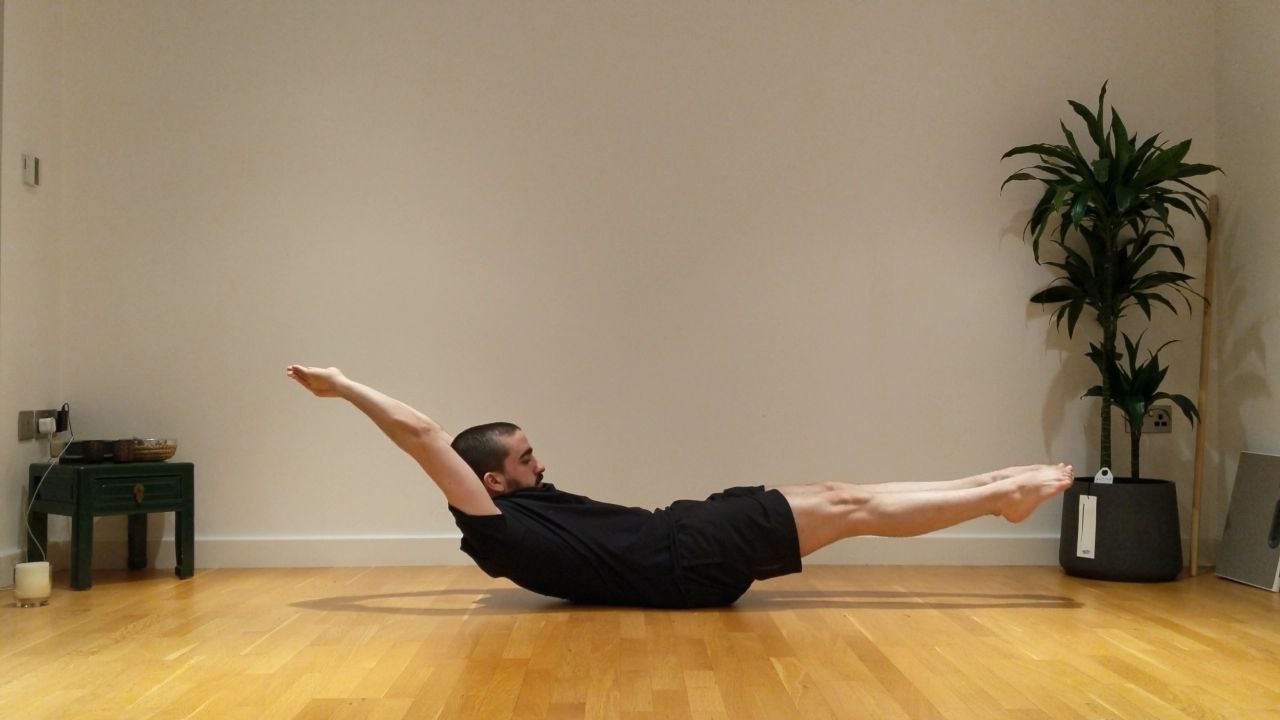
Level 6: Full layout
Deadbug Level 6: Full Layouts (a)
The final progression of the deadbug before you start to add external weight in the hands and feet is the Deadbug Lay-out. Both arms, both legs.
Thoughts
Notes
The Deadbug is without a doubt, the single most important core exercise out there, in my opinion. Through the process of learning and improving in deadbugs over time, you are not only:
- Working out ‘your core’,
- You will also be learning a lot about how to breathe properly (the way your body is “meant” to) and how that is related to core activation
- AND most importantly, you will learn how to coordinate all of your core muscles together to stabilise your mid-line (i.e. your spine and everything that moves when it moves) against resistance and even when your limbs are moving, which is incredibly important for bodyweight exercise and barbell training alike.
This process is referred to as ‘Bracing’.
[…]
It takes a long time and a lot of practice to refine your control of your breathing and develop a fine and articulate command of your individual core muscles, so the sooner you start learning it in your journey, the sooner you can reap the benefits of it being performed correctly.
Controlling your breathing
for our very first step, we are going to practice breathing only from the diaphragm, without making those accessory muscles do any work.
To do this, lie flat on your back with your knees up (you can also put your legs up on a chair, or your bed).
Place one hand on your upper chest (just below your neck, around your collarbones) and the other between the bottom of your ribs and your belly-button.
Now try breathing, just normally as you would. What you might find is any of the following:
- Your upper hand moves up as you breathe in and down as you breathe out, but your lower hand does not (This means your accessory breathing muscles are working far too hard, and your diaphragm is working extremely inefficiently)
- Both your upper and lower hands both move up and down as you breathe in and out (The diaphragm is working more but the accessory muscles are still working when they shouldn’t)
- Your lower hand moves, but your upper hand does not (The diaphragm is working well, and the accessory muscles are relaxed as they should be)
We are aiming to achieve the third outcome there: The bottom hand should rise and fall as you breathe, but there should be no movement in the top hand, as seen below:
Deadbug Level 0: Breath Control (a)
You may need to practice this for 5-10 minutes or even more to achieve this consistently, or you may be able to do it immediately. In any case, work on this until you can, then move on.
(Extra credit: if you can do this perfectly, place both hands on the sides of your lower back and try again. If you can create expansion here too, your diaphragm is really firing on all cylinders, so to speak.)
Bracing and the ‘Static Deadbug Hold’
The brace is, essentially, contracting almost everything all at once, so to brace, we will be simultaneously:
- Pushing the belly (and sides and back, if you’re good) out with the diaphragm (Full Brace Only*)
- Pulling the belly in with the transverse abdominis
- Drawing the sides together with the internal obliques
- Bringing the ribs down with the internal obliques, and optionally the rectus abdominis depending on the type of brace (or, at first, likely only the rectus abdominis)
[…]

Full brace
The ‘Full’ Brace is used during scenarios where you are manipulating vey heavy external loads, such as barbell training, picking up a sofa, or a heavy box. This is because in lifting heavy loads, it is very important (not only for your ability to express your strength to its fullest ability, but also for the safety of the movement on your back) that your spine stays rigid and unmoving in its chosen position. By having some air in your lungs, it really gives something for the brace to ‘bite down on’, so to speak.
The best way to explain this is with the analogy of a can of soda. If you push into the side of an open or empty can of soda, the can deforms very easily. You could probably bend it in half if you wanted to. This is what your back is like when you are not braced.
However, if you tried to push into a closed can of soda, it would be much harder. This is because the liquid, and the gas inside of it, is pushing outwards against the walls of the can, stabilising it. That’s what a brace is like.
A FULL brace is like if you tried to push your thumb into the side of a can of soda you had just vigorously shaken up a few moments prior. All the gas has escaped from the liquid, and is pushing HARD against the can. You couldn’t dent that sucker if you tried.
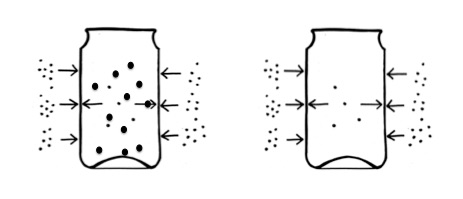
Empty brace
[…] an empty brace takes the above concepts and uses them against the core muscles in order to force them to work harder. By bracing with absolutely minimal air in your lungs, your core has to contract and compress so much harder to find even 1/10 of the stability and tension.
Is this not just a ‘Hollow Hold’?
If you are familiar with bodyweight fitness or gymnastics strength training, you may know of a common gymnastics core conditioning exercise known as the ‘hollow body hold’. Many people I’ve come into contact that fit this description are perplexed by the deadbug, often saying ‘so, basically a hollow hold, right?’. If you were to look at the starting progression of both, you would see they’re quite similar.
Hollow hold: Starting position
Deadbug: Starting position
However, when investigating their purpose, their internal cues, and their full end progressions, you can see a stark difference between them:
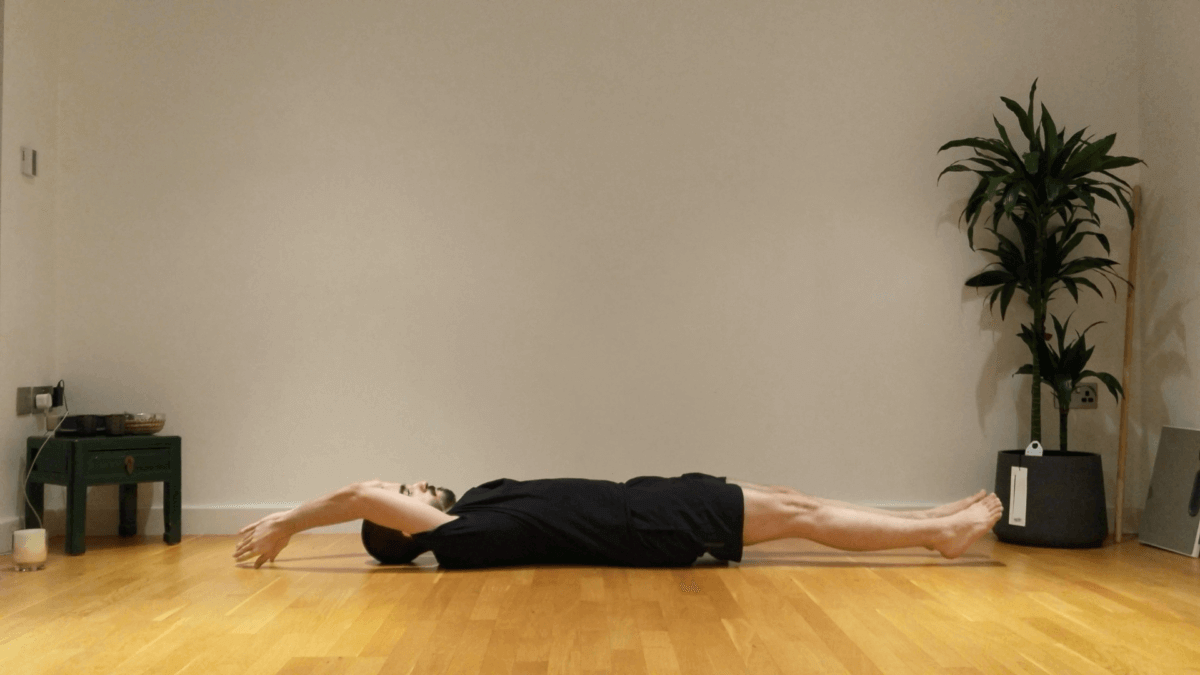
Full hollow: End position
Deadbug: End position
So looking at the end position, you can see that the hollow aims to achieve what is called a ‘globally flexed’ position, as it is one of the two fundamental body shapes (The other being the ‘Arch Hold’, a globally extended position) that a gymnast needs to be able to maintain under high speeds of tumbling and flipping though the air in various apparati events.
This globally flexed position and lack of focus on internal cueing in favour of focus on external shape and rigid tension from the tips of the fingers to the tips of the toes means this exercise predominantly works the rectus abdominis, like many other core exercises.
Conversely, deadbugs are an exercise in full, complete, coordinated core bracing in a neutral (or slightly flexed in the lower back) spine position. The focus is very much on the brace, not necessarily on the shape, there is little to no tension in the limbs, and it is performed with an ’empty brace’ to maximally challenge the core. It is also not simply enough to replicate the look of deadbugs; if the transverse abdominis, or the internal obliques are not properly contracting for example, the deadbug is not being properly performed because the brace is not complete or coordinated.